Club Car Battery Charger Manual⁚ A Comprehensive Guide
Welcome to your comprehensive guide! This resource provides essential information for understanding and utilizing your Club Car battery charger effectively. We will explore key features, safety, operation, troubleshooting, and maintenance, ensuring optimal battery performance and longevity. Let’s dive in!
Understanding Club Car Battery Chargers
Understanding Club Car battery chargers involves grasping their fundamental purpose⁚ to replenish the energy in your golf cart’s batteries. These chargers aren’t just generic power supplies; they’re specifically designed to provide the correct voltage and current for your Club Car’s battery system, ensuring optimal charging and extending battery life. Modern Club Car chargers are automatic, detecting battery voltage and adjusting the charging process accordingly.
Different Club Car models may utilize different charger types, like PowerDrive, ERIC or Lester Summit Series II. It is very important to use the correct charger for your specific golf cart model. These chargers often feature sophisticated charging algorithms that prevent overcharging and maintain battery health.
External chargers are also available, offering flexibility and convenience. It’s crucial to understand the charger’s specifications, including input voltage requirements (typically 120V) and output characteristics. Familiarize yourself with the charger’s indicators, such as warning lights, which signal the charging status and potential issues. Consulting your Club Car charger manual is essential for safe and effective operation.
Key Features of PowerDrive Battery Chargers
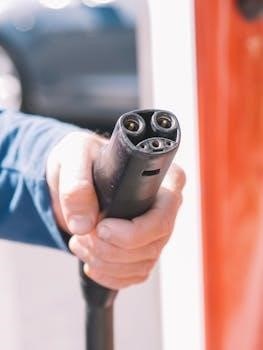
PowerDrive battery chargers, commonly used in Club Car golf carts, boast several key features designed for efficient and safe battery maintenance. One notable feature is the charge interlock system. PowerDrive chargers utilize a DC plug with three pins, unlike standard two-blade plugs. The third pin acts as a sensing lead, establishing a communication link between the charger and the golf cart, ensuring proper connection and preventing accidental disconnection during charging.
These chargers are designed to prevent overcharging, automatically shutting off once the batteries reach full capacity, extending the life of the batteries and preventing damage. The PowerDrive chargers also have indicator lights that provide information on the charging status, such as charging, full, or error conditions.
Some models include features like an interrupted charge cycle indicator. This warning light will repeatedly illuminate if AC power to the charger is interrupted during the charging process. It is important to consult the PowerDrive charger manual for detailed information on all features and functions.
Safety Precautions and Important Information
Prioritizing safety is paramount when operating and maintaining Club Car battery chargers. Before using the charger, thoroughly read the instruction manual to prevent personal injury, property damage, or even death. Always ensure the charger is connected to a properly grounded outlet with the correct voltage, typically 120 volts for Club Car chargers. Inspect the charger and its cords for any signs of damage before each use; damaged chargers should not be used and must be repaired or replaced.
When charging, ensure the area is well-ventilated to prevent the accumulation of explosive gases released during the charging process. Never smoke or allow open flames near the batteries or charger. Avoid charging batteries in direct sunlight or extreme temperatures. Always disconnect the charger from the AC power supply before disconnecting it from the golf cart batteries.
It’s crucial to regularly check the battery water levels and fill them as needed with distilled water. If the battery warning light illuminates repeatedly during a charge cycle, consult a Club Car distributor or dealer for assistance.
Operating Instructions for Club Car Chargers
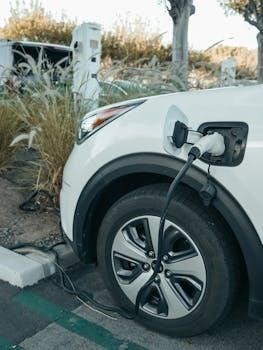
To ensure proper operation of your Club Car battery charger, adhere to these instructions. Begin by connecting the charger’s DC plug securely into the receptacle on your Club Car. Ensure the connection is firm to avoid interruptions during the charging process. Next, plug the charger into a grounded AC power outlet with the correct voltage as indicated in your charger’s manual.
Once connected, the charger will automatically begin the charging cycle. Many modern Club Car chargers feature automatic detection, adjusting the charging process based on the battery’s voltage. Observe the charger’s indicator lights to monitor the charging progress. A solid light typically indicates charging is in progress, while a flashing light may signal an error or specific charging stage.
Allow the charger to complete its cycle, which may take several hours depending on the battery’s condition and the charger’s specifications. Avoid disconnecting the charger prematurely, as this can reduce the battery’s lifespan. Once charging is complete, disconnect the charger from the AC outlet before disconnecting it from the golf cart.
Troubleshooting Common Charger Issues
Encountering problems with your Club Car battery charger can be frustrating, but many issues can be resolved with basic troubleshooting. Begin by verifying the AC power source. Ensure the outlet is functioning correctly by testing it with another device. Check the charger’s power cord for any damage, such as cuts or fraying.
If the charger isn’t initiating a charge, inspect the DC plug connection to the golf cart. A loose or corroded connection can prevent the charger from operating. Clean the contacts on both the plug and the receptacle with a wire brush and ensure a secure fit.
Observe the charger’s indicator lights for error codes. Consult your charger’s manual to identify the meaning of specific error codes. These codes can provide valuable clues about the nature of the problem. If the battery warning light illuminates repeatedly, it may indicate an interruption in AC power during the charge cycle.
If these steps fail to resolve the issue, consider having the charger and batteries inspected by a qualified Club Car distributor or dealer.
Interpreting Error Codes and Warning Lights
Understanding the error codes and warning lights on your Club Car battery charger is crucial for diagnosing potential problems. These indicators provide valuable insights into the charger’s operational status and can help you take appropriate action.
Consult your Club Car charger manual to identify the specific meaning of each error code or light sequence. A flashing yellow diamond, for instance, may indicate an OBC (On-Board Computer) communication failure, particularly in newer models. Some chargers use blinking patterns to convey specific error messages. Pay close attention to the frequency and duration of the blinks.
A continuously illuminated battery warning light, especially if accompanied by error codes, often signals an issue with the batteries themselves, such as low voltage or sulfation. In some cases, this warning light may also indicate an interruption in the AC power supply during the charging cycle.
If you are unsure about the meaning of a particular error code or warning light, consult with a Club Car dealer or qualified technician for assistance.

Maintenance and Service Procedures
Regular maintenance is key to ensuring the longevity and optimal performance of your Club Car battery charger. Always disconnect the charger from the power source before performing any maintenance or service procedures.
Keep the charger clean and free of dust and debris. Use a dry cloth to wipe down the exterior of the charger regularly. Inspect the DC plug and AC cord for any signs of damage, such as cracks or frayed wires. Replace any damaged components immediately.
Periodically check the connections to the batteries to ensure they are clean and tight. Loose or corroded connections can impede the charging process. Clean the battery terminals and connectors with a wire brush and apply a corrosion inhibitor.
If you suspect a problem with the charger’s internal components, such as the transformer or circuit board, consult a qualified technician for repair. Attempting to repair the charger yourself without proper training can be dangerous and may void the warranty. Refer to your Club Car charger manual for detailed maintenance and service guidelines.
Bypassing OBC for Charging (2004+ Models)
The On-Board Computer (OBC) in 2004 and newer Club Car models manages the charging process. Bypassing the OBC might be necessary if it malfunctions or to use an aftermarket charger. However, proceed with caution as incorrect bypassing can damage your batteries.
Bypassing typically involves disconnecting the OBC from the charging circuit. Locate the OBC, usually near the battery pack. Disconnect the wires connecting the OBC to the charger receptacle and the batteries. Connect the charger directly to the battery pack, ensuring correct polarity.
Using a voltmeter, verify that the charger is delivering the correct voltage to the batteries. Monitor the charging process closely to prevent overcharging. A manual charger requires vigilance, as it lacks the automatic shut-off feature of the OBC.
Always consult your Club Car charger manual or a qualified technician before attempting to bypass the OBC. Improper bypassing can lead to battery damage, electrical hazards, or voiding your vehicle’s warranty. Proceed at your own risk, understanding the potential consequences.
Locating and Utilizing Club Car Charger Manuals

Accessing the correct Club Car charger manual is crucial for safe and effective operation. These manuals provide detailed information on charger features, troubleshooting, and maintenance. Start by checking the Club Car website, where you can often find digital manuals based on your charger model.
Alternatively, search online using the charger model number or vehicle year. Many online resources offer downloadable PDFs of Club Car manuals. Websites specializing in golf cart parts and accessories may also host manuals.
Once you’ve located the manual, familiarize yourself with its contents. Pay close attention to safety precautions, operating instructions, and troubleshooting guides. Understanding error codes and warning lights can help you diagnose and resolve charger issues quickly.
The manual will also provide guidance on proper maintenance procedures, such as cleaning terminals and inspecting cables. Regular maintenance ensures optimal charger performance and extends its lifespan.
Refer to the manual whenever you encounter charger problems or have questions about its operation. Consulting the manual first can save you time and prevent potential damage.